ตัวจัดการบัญชี
ตัวจัดการบัญชี คือส่วนเสริมที่ผู้เล่นสามารถซื้อเพิ่มได้จากบัญชีพรีเมี่ยม มันออกแบบมาเพื่อช่วยให้คุณบริหารหมู่บ้านของคุณ เมื่อคุณมีหมู่บ้านเป็นจำนวนมากในบัญชีของคุณ ทั้งนี้มันจะสามารถเปิดใช้ได้ต่อเมื่อคุณมีจำนวนหมู่บ้าน 20 หมู่บ้านเป็นต้นไป
คุณสามารถเปิดใช้งานตัวจัดการบัญชีโดยใช้คะแนนพรีเมี่ยมของคุณ ในการเปิดใช้นั้นให้คลิกบนเมนู "พรีเมี่ยม" ในเกมส์จากนั้นเลือก "ตัวจัดการบัญชี"
ภาพรวม
หน้าจอภาพรวมตัวจัดการบัญชีจะให้รายละเอียดต่างๆ แก่คุณ ข้อมูลเหล่านั้นจะเป็นสถานะของตัวจัดการบัญชี และสิ่งที่มันกำลังดำเนินการอยู่ แต่ละกล่องจะประกอบไปด้วยข้อมูลที่เกี่ยวกับส่วนต่างๆ ของตัวจัดการบัญชีของคุณ และคุณสามารถคลิกค้างเพื่อลากมันไปยังลำดับที่คุณต้องการได้
คลิกที่ไอคอนเครื่องมือ ตรงที่มันปรากฎตรงส่วนมุมบนซ้ายของกล่องเหล่านั้นมันจะช่วยให้คุณแก้ไขจำนวนของรายการที่คุณต้องการเห็นในภาพรวมได้
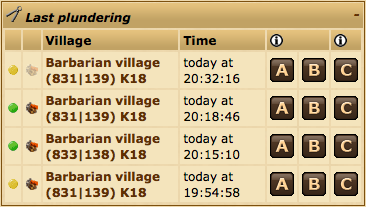
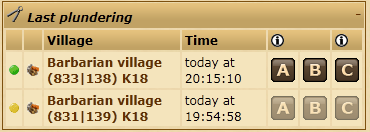
การปล้นสะดมครั้งล่าสุด
วิตเจ็ตนี้สามารถใช้ร่วมกับ ตัวช่วยฟาร์ม เพื่อให้การส่งกองกำลังไปฟาร์มทำได้ง่ายขึ้น เพื่อไปยังหมู่บ้านที่ปล้นล่าสุด มันจะแสดงหมู่บ้านคนเถื่อนที่คุณได้โจมตีและปล้นทรัพยากรล่าสุดจากมัน
สำหรับข้อมูลเพิ่มเติมของไอคอน A, B และ C โปรดอ่าน ส่วนช่วยเหลือตัวจัดการไฟล์
ภาพรวมหมู่บ้าน
ในแผงควบคุมภาพรวมหมู่บ้านจุดสีจะบ่งบอกสถานะของตัวจัดการกองกำลัง ตัวจัดการหมู่บ้าน และตัวจัดการตลาดของคุณ จุดสีเขียวบ่งบอกว่าตัวจัดการยังเปิดใช้อยู่ในหมู่บ้านนั้นๆ จุดสีเทาแสดงว่าไม่มีงานที่คุณได้มอบหมายไว้เหลือแล้ว สีเหลืองบ่งบอกว่าหมู่บ้านนั้นได้ถูกจัดการแล้ว แต่ตัวจัดการนั้นๆ ถูกหยุดชั่วคราวอยู่
การคลิกบนจุดสีเขียว หรือเหลืองจะเป็นการ หยุดชั่วคราว/เริ่มใหม่ ของตัวจัดการหมู่บ้าน และการคลิกบนจุดสีเทาจะพาคุณไปยังตัวจัดการหมู่บ้านที่เกี่ยวข้องของหมู่บ้านนั้น
แม่แบบการก่อสร้าง
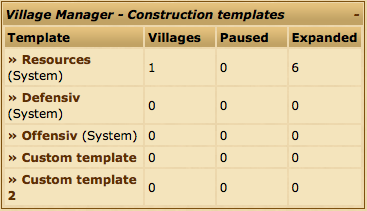
ส่วนแม่แบบการก่อสร้างจะบอกภาพรวมของแม่แบบของ ตัวจัดการหมู่บ้าน ทั้งหมด
คุณสามารถดูจำนวนของหมู่บ้านที่ถูกจัดสรรไปยังแม่แบบแต่ละอันได้ มีหมู่บ้านมากเท่าไรที่ถูกหยุดจัดการชั่วคราว และจำนวนของการอัพเกรดสิ่งก่อสร้างที่ถูกเพิ่มไว้ในคิวงานแล้ว
คำเตือนและข้อแนะนำ
ถ้าฟาร์มของคุณเต็มหรือโรงงานของคุณเต็ม ข้อมูลเหล่านั้นจะถูกแจ้งที่นี่
การแจ้งเตือน
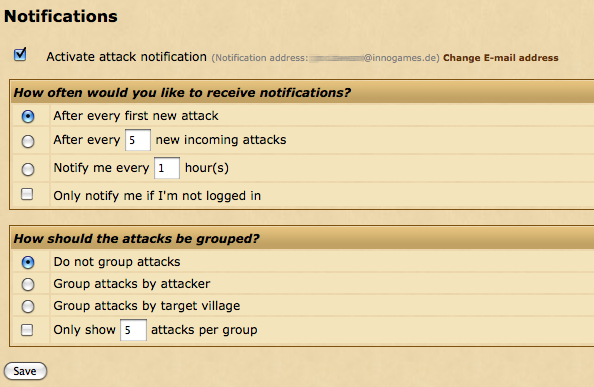
ในหน้าจอการแจ้งเตือน คุณสามารถตั้งค่าตัวจัดการบัญชีให้ส่งอีเมล์หาคุณเมื่อคุณมีกองกำลังที่กำลังเดินทางเข้ามา ในการเปิดการแจ้งเตือนการโจมตีให้ติ๊กถูกลงไปในกล่อง "เปิดการแจ้งเตือนการโจมตี" ซึ่งมันจะอนุญาตให้คุณปรับแต่งต่อตามใจคุณ
ตัวเลือกถูกแบ่งออกเป็นสองส่วน
คุณต้องรับการแจ้งเตือนบ่อยแค่ไหน?
ในส่วนแรกนี้จะเป็นรูปแบบของเงื่อนไขภายใต้ข้อกำหนดของคุณว่าคุณอยากได้รับอีเมล์การแจ้งเตือนสำหรับการโจมตีแบบไหน
| หลังจากมีการโจมตีทุกๆ ครั้งแรก | คุณจะได้รับการแจ้งเตือนเมื่อมีกองกำลังที่กำลังเข้ามาจาก 0 ไปเป็น 1 |
| หลังจากทุก (XX) การโจมตีใหม่ | คุณจะได้รับการแจ้งเตือนทุกๆ ครั้งที่จำนวน (XX) ของการโจมตีใหม่ถูกส่งเข้าไปที่หมู่บ้านของคุณ |
| แจ้งเตือนฉันทุกๆ (XX) ชั่วโมง' | คุณจะได้รับการแจ้งเตือนเพียงหนึ่งครั้งต่อจำนวน (XX) ชั่วโมงที่ระบุไว้ |
| แจ้งเตือนเฉพาะตอนที่ฉันไม่ได้อยู่ในเกมส์ | ถ้าเลือก, คุณจะได้รับการแจ้งเตือนต่อเมื่อคุณไม่ได้เข้าสู่ระบบ หรือเล่นเกมส์อยู่ |
การโจมตีจะถูกรวมกลุ่มอย่างไร?
ส่วนนี้เป็นรูปแบบว่าคุณต้องการจะเห็นข้อมูลถูกจัดแสดงอย่างไรในการแจ้งเตือนการโจมตีของคุณ
| อย่ารวมการโจมตีเข้าด้วยกัน | การโจมตีจะถูกแสดงตามอันดับ โดยไม่รวมกลุ่มกัน |
| รวมกลุ่มการโจมตีจากผู้โจมตี | การโจมตีจะถูกจัดแสดงตามชื่อของคนโจมตี |
| รวมกลุ่มการโจมตีโดยหมู่บ้านเป้าหมาย | การโจมตีจะถูกจัดกลุ่มตามหมู่บ้านที่กำลังตกเป็นเป้าการโจมตี |
| 'แสดงเฉพาะ (XX) การโจมตีต่อกลุ่ม | การแจ้งเตือนจะทำต่อเมื่อได้รวมจำนวนที่เลือก (XX) ของการโจมตีแต่ละกลุ่มเข้าด้วยกัน |
ตัวจัดการหมู่บ้าน
ตัวจัดการหมู่บ้านสามารถใช้สำหรับการเพิ่มสิ่งก่อสร้างลงในคิวให้หมู่บ้านของคุณอย่างอัตโนมัติ คุณสามารถกำหนดระดับเป้าหมายของสิ่งก่อสร้างที่ต้องการได้ และจัดลำดับว่าอะไรควรสร้างก่อนหรือหลังโดยใช้ระบบแม่แบบ
การจัดการแม่แบบ
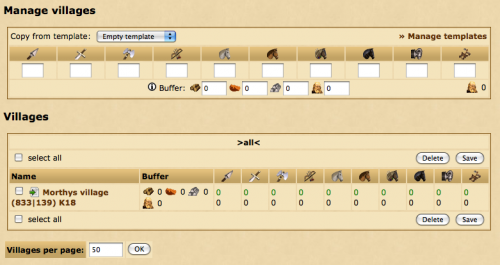
โดยปกติเมื่อคุณเปิดตัวจัดการหมู่บ้าน คุณจะเห็นหน้าจอ จัดการหมู่บ้าน ในการจัดการแม่แบบของคุณโปรดคลิกบน จัดการแม่แบบ
แม่แบบของระบบ
เกมส์มีแม่แบบ 3 แบบติดมากับระบบสำหรับให้คุณใช้ ซึ่งมันไม่สามารถแก้ไขและถูกลบได้
แม่แบบของระบบมีดังนี้:
- ทรัพยากร - โดยทั่วไปใช้ในการสร้างหมู่บ้านเพื่อเก็บเกี่ยวทรัพยากรเพื่อใช้สร้างสิ่งก่อสร้างให้ถึงระดับ 30 ก่อน
- การป้องกัน - สำหรับหมู่บ้านที่เน้นผลิตกองกำลังป้องกัน
- การโจมตี - สำหรับหมู่บ้านที่เน้นผลิตกองกำลังสำหรับโจมตี
การสร้างแม่แบบของคุณเอง
คุณสามารถสร้างแม่แบบของคุณเอง ถ้าแม่แบบ 3 อันของระบบไม่ใช่แม่แบบที่คุณต้องการ ในการสร้างแม่แบบนี้กรอกชื่อแม่แบบภายใต้ส่วนของ สร้างแม่แบบ และเลือกว่าจะเริ่มสร้างเองโดยคัดลอกจากแม่แบบว่าง หรือคัดลอกจากแม่แบบที่มีอยู่แล้วก็ได้
ดู เปลี่ยนชื่อ และลบแม่แบบ
ภายใต้การ สร้างแม่แบบ คุณสามารถพบรายการแม่แบบที่มีของคุณ สิ่งก่อสร้างตามระดับที่แสดงอยู่ในตารางนั้นจะเป็นเป้าหมายของระดับสิ่งก่อสร้างเมื่อตัวจัดการหมู่บ้านได้ทำงานเสร็จในหมู่บ้านของคุณ ใต้ สร้างแม่แบบ
คุณสามารถคลิกที่ไอคอน ![]() เพื่อเปลี่ยนชื่อแม่แบบหรือ
เพื่อเปลี่ยนชื่อแม่แบบหรือ ![]() เพื่อลบ โปรดทราบว่าแม่แบบของระบบนั้นไม่สามารถถูกลบ หรือเปลี่ยนชื่อได้
เพื่อลบ โปรดทราบว่าแม่แบบของระบบนั้นไม่สามารถถูกลบ หรือเปลี่ยนชื่อได้
สำหรับการดูหรือแก้ไขลำดับของแม่แบบให้คลิกที่ชื่อของมัน
การแก้ไขแม่แบบ
เหมือนกับในหน้า ภาพรวม ที่ผ่านมา ซึ่งมันจะแสดงระดับที่กำหนดไว้ของแต่ละสิ่งก่อสร้าง
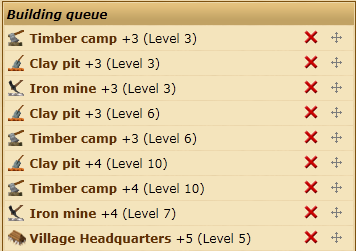
ด้านใต้นี้ คิวงานก่อสร้าง แสดงลำดับของสิ่งก่อสร้างที่กำลังจะถูกอัพเกรด มีระดับเหลืออีกเท่าไรที่มันควรจะถูกอัพเกรด และระดับของสิ่งก่อสร้างที่จะเป็น หลัง การอัพเกรดเสร็จสิ้น
คุณสามารถลบการอัพเกรดจากคิวงาน โดยการคลิกไอคอน ![]() ถ้าคุณต้องการจะเปลี่ยนลำดับคิวคุณสามารถคลิกค้างแล้วลากไอคอน
ถ้าคุณต้องการจะเปลี่ยนลำดับคิวคุณสามารถคลิกค้างแล้วลากไอคอน ![]()
อย่างไรก็ดีไม่เหมือนกับส่วนอื่นๆ ของเกมส์ที่คุณลบ หรือแก้ไขไปแล้ว คิวงานจะไม่ได้บันทึกโดยอัตโนมัติ คุณต้องคลิกบนปุ่ม "บันทึก" ด้านล่างเพื่อบันทึกการเปลี่ยนแปลงที่คุณทำ รวมไปถึงคุณก็ต้องคลิกปุ่ม "บันทึก" หลังจากคุณได้เพิ่มงานใดๆ เข้าไปในคิวเช่นกัน
นอกจากนั้นคุณยังมีตัวเลือกสำหรับการสั่งให้ตัวจัดการหมู่บ้านทำลายสิ่งปลูกสร้างใดๆ ที่มีระดับสูงเกินกว่าเป้าหมายที่กำหนดไว้ในแม่แบบของคุณ ตัวจัดการหมู่บ้านจะดำเนินการทำลายต่อเมื่อที่ทำการหมู่บ้านของคุณมีระดับอย่างน้อย 15 และหมู่บ้านของคุณมีระดับความจงรักภักดีอยู่ที่ 100%
ในการเพิ่มสิ่งปลูกสร้างใหม่เข้าไปยังคิวให้ใช้ส่วนของการ สั่งเพิ่ม ที่ด้านท้ายของหน้า
ตัวจัดการหมู่บ้านจะจัดลำดับการก่อสร้างตามรายการที่แสดงในหน้านี้ นั่นหมายความว่าหากคุณเพิ่มการอัพเกรดค่ายทหาร 20 ระดับในครั้งเดียว จากนั้นตัวจัดการหมู่บ้านจะดำเนินการอัพเกรด 20 ระดับนั้นก่อนจะเลื่อนไปยังสิ่งก่อสร้างต่อไป ถ้าคุณเพิ่มค่ายทหาร 2 ระดับ จากนั้นโรงตีเหล็ก 2 ระดับ จากนั้นซ้ำไป 10 รอบ ตัวจัดการหมู่บ้านจะดำเนินการสร้างทั้งสองสิ่งก่อสร้างนั้นไปอย่างเท่าๆ กันจนเสร็จ
มอบหมายแม่แบบเพื่อใช้จัดการหมู่บ้านของคุณ
คุณสามารถมอบหมายแม่แบบเพื่อใช้กับหมู่บ้านและจัดการทั่วๆ ไปในตัวจัดการหมู่บ้านจากหน้า จัดการหมู่บ้าน
การมอบหมายหรือนำแม่แบบออกจากหมู่บ้าน
สำหรับการมอบหมายแม่แบบไปยังหมู่บ้านหนึ่งหรือมากกว่า คุณต้องเลือกมันโดยการติ๊กในกล่องทางด้านซ้ายของชื่อหมู่บ้าน
จากนั้นโปรดแน่ใจว่า ใช้แม่แบบ ได้ถูกเลือกในกล่องรายการ การกระทำ จากนั้นเลือกแม่แบบที่ต้องการจากรายการและคลิกที่ ยืนยัน
คุณสามารถได้รับการยืนยันว่าแม่แบบถูกมอบหมายแล้วโดยการดูที่คอลัมม์ สถานะ สำหรับหมู่บ้านที่ต้องการตรวจสอบ มันจะแสดงคำว่า เปิดใช้งาน
ในการลบแม่แบบจากหมู่บ้าน คุณสามารถทำได้คล้ายๆ ด้านบนแต่เลือกคำว่า ลบ จากกล่องรายการ
คุณยังสามารถมอบหมายแม่แบบไปยังหมู่บ้านโดยการไปที่ ที่ทำการหมู่บ้าน โดยคลิกบนแท็บ ตัวจัดการหมู่บ้าน และเลือกใช้แม่แบบที่จะใช้จาก การเปลี่ยนแม่แบบ
Pausing and continuing the account manager
If you want to save your resources in a village then it is possible to pause the Village Manager without having to remove the template.
You can do this in a similar fashion to adding a template to a village, just either select Pause or Continue from the drop down box.
You can also directly click Pause or Continue in the status column for the village.
General notes
The Village Manager will periodically check your building queue and queue new upgrades when possible. It can sometimes take a few minutes for the manager to start queuing buildings after you've assigned a template.
The manager cannot bypass building, population or resource requirements.
If a village's warehouse is not large enough for the next upgrade in the build order to be queued then it will attempt to queue a warehouse upgrade.
Similarly, if the farm is too small it will attempt to queue a farm upgrade.
The village manager allows you to process up to 50 building orders automatically in each village, after which it will pause and you must reactivate it.
Troop Manager
The troop manager allows you to automate the recruiting of units, by choosing how many units you want to build in each village. When resources are available, the troop manager will automatically recruit units for you.
You can apply troop numbers directly to villages, or you can create and save templates to keep for future use, and apply them to villages later.
Using the troop manager to recruit units
In the "Manage villages" panel at the top of the troop manager screen, enter in the number of units you would like to be built in total for one village. You can also set a buffer if you like, to reserve resources or population space. Once you are happy with your input, in the villages panel below check (tick) the villages you would like to apply this troop build to, then click save to start the recruitment process.
If you have created templates (see below for how to do this), you can apply these to villages instead of inputting a new set of unit numbers each time. In the top panel (the "Manage villages" panel), choose the template you want to use from the dropdown list. Then, in the villages panel, check (tick) the villages you would like to apply a template to. Click the save button to apply your chosen template to those selected villages.
It usually takes a few minutes for your troops to start being recruited if you have the resources and farm space available.
Buffer
You can choose to reserve population slots or resources so they will not be used by the troop manager. For example, if you set your population buffer to 100, then 100 population slots will always be kept free and the troop manager will stop recruiting new units when you only have 100 population slots left in your farm.
Creating and editing your own templates
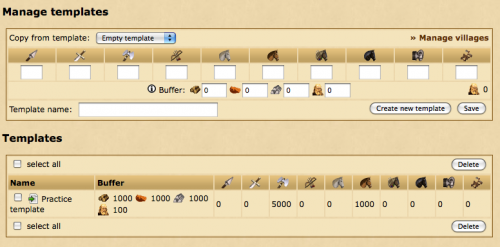
To edit templates or make new ones, click the manage templates link in your troop manager. This will bring you to the template editor screen.
Creating a new template
Enter in your desired final troop numbers into the units input boxes, and give it a name in the "template name" field. You can also set a buffer value for this template. Once you have done this, click "create new template" to save the new template.
Editing an existing template
To edit an existing template, click the green edit icon beside the name of the template you want to edit in the templates panel at the bottom of the screen. This will insert the template information into the area above. Adjust the troop numbers and buffer as desired, and then click "save".
Applying templates to villages
Once you have created a template, you will need to apply it to a village to get it to start recruiting units. You can do this from the main Troop Manager screen.
In the top panel (the "Manage villages" panel), choose the template you want to use from the dropdown list. Then, in the villages panel, check (tick) the villages you would like to apply a template to. Click the save button to apply your chosen template to those selected villages.
Deleting templates
To delete a template, check (or tick) the box beside the template name, and click "delete".
Market Manager
The market manager allows you to set up automatic resource transfers between your villages that are sent at predefined times.
Creating a new trading route
Please note that when you create a new trading route the sending village is your currently selected village.
To create a new trading route, either enter the coordinates of the target village in the Destination section or use the Favorites, Your own or History helper links on the right.
Next, input the number of resources that should be transferred in the Resources section.
Lastly, you can choose when the resources should be sent. You can select any of the days of the week and you need to enter the time of day the transfer should be initiated.
Resources will only be sent if the village has enough resources and enough merchants are available.
Viewing and deleting a trading route
Once you have created trading routes you can view a list of them at the bottom of the page. You can see the next scheduled sending time to be sure you've entered the correct days and time.
It is not currently possible to edit a trading route.
To delete routes either click on the delete link next to the route or tick the check-boxes next to the routes you wish to delete then click the Delete button below.
Farm Assistant
The Farm Assistant allows you to easily send farming attacks to barbarian villages around you, either directly from the map or from recent attack reports in the Account Manager overview.
You can create two templates to configure different combinations of troops to send on farming attacks. For simplicity, these are called A and B.
Creating a new template
To create a new template click on New template underneath the Edit Templates section. A new section should appear on the right side of the page.
You can give your template a description to allow yourself to easily identify it in the future.
Once you've entered the desired troop combinations click Save to add the new template.
Editing or deleting a template
If you need to change the description or troops inside of a template you can edit it by clicking on the template description under the Edit Templates' section.
If you'd prefer to delete a template and start over from scratch you can click the red cross to the right of the template description.
Using the Farm Assistant from the map
Once you've set up one or two templates you can now use the Farm Assistant on the map. Note that you must have the Context menu enabled.
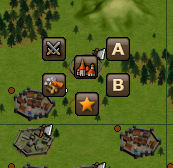
When clicking on a barbarian village you should now notice new icons labeled A and B. These correspond with the templates you created from within the Farm Assistant area. To send an attack simply click on the icon and the troops will be sent with no confirmation required.
Note that this only works on barbarian villages. It is not possible to attack a player owned village without going to the rally point and confirming the attack.
Using the Farm Assistant from the Account Manager overview
You can also use the Farm Assistant to send troops based on your recently received reports. You can do this from the Most recent plunders widget on the Overview.
The widget will show a list of recently received reports where you have attacked a barbarian village and looted resources.
Like the map, you can click on either A or B to send troops from one of your templates to the village.
There is also a C icon, which has a special functionality and does not relate to any of your templates. Clicking on C will use your most recent scout report to attempt to calculate and send the right amount of troops to loot all of the village's resources. You will receive a popup with the exact amount of troops sent.
You can only use the C icon if you have recently scouted the village.
